A wall in your living room looks flawless. A smooth layer of paint, no stains. But behind that half inch thick drywall, a real disaster could be hiding: wet mineral wool insulation, black mold, and rotting wooden studs. In Manhattan Beach, where the ocean breeze brings salt and humidity, this happens more often than you think.
Here is a step by step guide to finding hidden swamp inside your wall, even when the outside is completely dry. Each step includes specific numbers, materials, and time frames.
Step 1. Inspect walls in daylight. Look for stains by color and shape.
What exactly to look for:
Stand at an angle so light skims the surface. Water that seeps inside pulls gypsum and impurities from the drywall, leaving traces.
Types of stains and what they mean:
Yellow or brown rings, like coffee stains. Water has evaporated but dissolved salts and tannins from the wooden frame remain. They appear 2 to 3 weeks after a leak starts.
Copper or rust colored streaks. Water has been in contact with metal: a pipe, a nail, or rebar. Iron oxides give reddish brown; copper oxides give greenish.
Dark vertical stripes from top to bottom. Water flowed along a stud or pipe. They usually widen downward.
Timeline:
The first stain can appear within 6 to 12 hours after a hidden leak starts if water is flowing actively. With a slow drip (one drop per minute) it takes 2 to 3 weeks.
Wall material matters:
Standard drywall (1/2 inch) absorbs water like a sponge. It soaks through completely in 4 to 6 hours with direct contact.
Moisture resistant drywall (green, 1/2 inch) lasts longer, but its gypsum core still deteriorates, just slower. First stains appear after 2 to 3 weeks.
Old lime based plaster can hide water for months, but when wet it crumbles and sounds hollow when tapped.
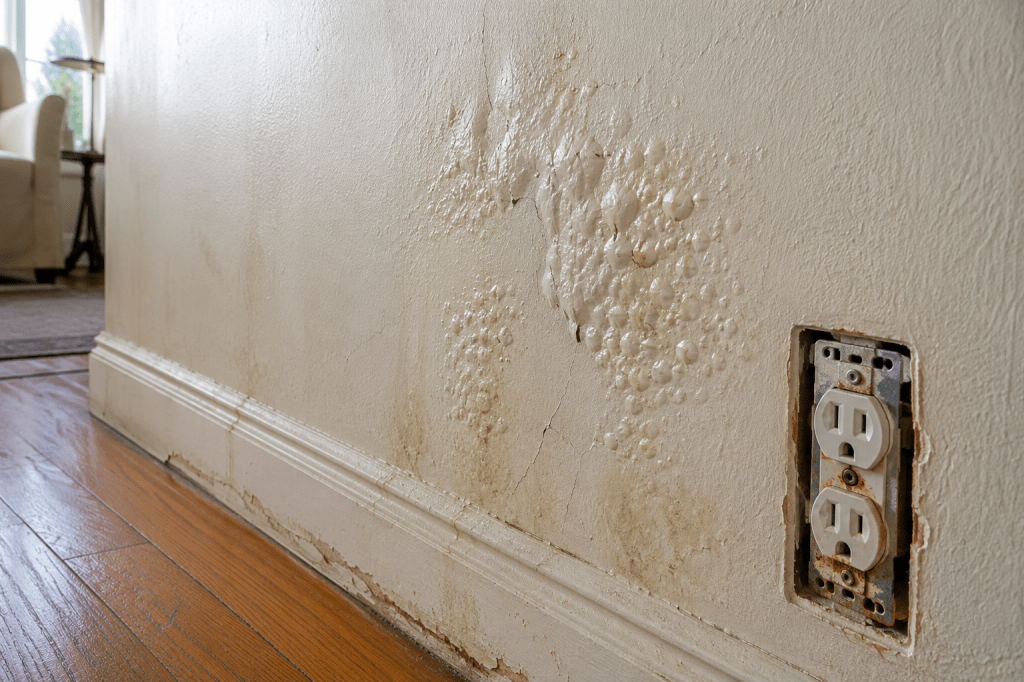
Step 2. Check paint and wallpaper. Catch the peeling at the right moment.
Mechanics:
Water trapped behind drywall creates vapor pressure when heated (by sun or a radiator). This vapor pushes paint away from the surface.
What to look for:
Blisters 0.2 to 2 inches in diameter. If you press a blister, it either pops with a spray (water still present) or crumbles as dry paint (water gone but drywall is damaged).
Peeling wallpaper. Edges lift 0.4 to 1.2 inches from the wall, with dark stains underneath. Mold often appears under wallpaper before it becomes visible on the surface.
Paint flaking into small scales. Typical in older homes where oil based paints were used. Water penetrates from behind, paint loses adhesion over 2 to 4 weeks.
Timeline:
With a continuous leak (for example, a pipe inside the wall leaking at 1 liter per hour), blisters are visible within 24 to 48 hours. With slow condensation, after a month.
What not to do:
Do not paint over or wallpaper over blisters. You will just seal moisture inside. It will continue destroying the drywall, and in 3 to 6 months the blisters will return on a larger area.
Step 3. Press the wall with your finger or palm. Assess hardness.
Normal:
Dry 1/2 inch drywall withstands a point load of up to 22 to 33 pounds without noticeable deformation. When pressed with a palm, it feels like a hard, resilient surface.
Abnormal:
If after 2 to 3 seconds of pressing with a single finger you feel the wall slightly spring back or sink by 1/16 to 1/8 inch, moisture content exceeds 18 to 20%.
If the wall sinks like thick cardboard (1/8 to 3/16 inch), the drywall has lost 60 to 70% of its strength. It will not recover.
Time based scenarios:
At 15 to 16% moisture, drywall can regain shape after drying (7 to 10 days of active drying).
At 20 to 25% moisture, the material starts to crumble. After drying it remains loose and friable.
Above 30% moisture, drywall turns into mush. It must be replaced.
Material specifics:
Standard drywall (gray) fails at 20% moisture within 2 to 3 weeks.
Moisture resistant drywall (green) survives up to 25 to 30% for 4 to 6 weeks, then fails.
Gypsum fiber board (GFB) is more durable, but with prolonged contact with water (more than 2 months) it swells and delaminates.
Step 4. Smell the air. Decode the odor.
Chemistry:
When water stagnates behind drywall, bacteria and fungi decompose organic impurities in dust, the paper facing of drywall, and wood framing. They release volatile compounds: geosmin, 2 methylisoborneol, and microbial metabolites.
Types of odors and what they mean:
Smell of wet earth or a basement. Geosmin. Appears 3 to 5 days after continuous wetting begins. This is the first signal.
Sweet, sickly sweet, like rotting fruit. Fungus Aspergillus or Penicillium. Appears after 1 to 2 weeks.
Sharp, chemical, ammonia like. Possible growth of Stachybotrys (black mold). Very dangerous. Requires immediate wall opening.
Timeline for odor:
At constant humidity above 60% and temperature 68 to 77°F, odor can appear within 48 to 72 hours. With intermittent wetting, after 2 to 3 weeks.
Perception trap:
Many people say «an old house smells like wood.» But old dry wood smells of resin and dust, not dampness. If the smell does not dissipate after an hour of airing out, moisture is present.
Step 5. Knock on the wall. Listen for differences in tone.
Physics:
Sound travels faster and with greater amplitude in dense material. Wet drywall loses density (water replaces air in pores, but the structure breaks down), and the sound becomes duller.
Technique:
Knock with a bent knuckle or a wooden ruler. Strike with the same force at intervals of 4 to 6 inches.
Interpretation:
A crisp, sharp click with a high pitch. Moisture up to 12 to 14%. Everything is fine.
A muffled sound, like hitting a cardboard box. Moisture 15 to 18%. Risk zone.
A dull, short «puff» with no resonance. Moisture above 20%. Drywall has lost density.
A sound like hitting wet cardboard with a slight squish. Water is inside. Open immediately.
Accuracy:
An experienced professional can detect a difference of 4 to 5% moisture by ear. A beginner needs a known dry section for comparison.
Step 6. Check outlets and switches. A dangerous zone.
Why this matters:
Water inside a wall flows downward along the path of least resistance. Electrical boxes are cavities that water easily enters. This creates a risk of short circuit and fire.
Safety first:
Turn off power to the room or the whole house at the breaker panel. Verify voltage is absent (with an indicator screwdriver or multimeter). Then unscrew the cover plate.
What to look for:
Rust on the metal outlet housing. Orange spots or coating. Appears 1 to 2 weeks after a leak starts.
Corrosion on copper contacts. Greenish coating. Copper oxidizes when in contact with moisture and air over 3 to 4 weeks.
White or gray fuzzy coating. Oxidation of aluminum wires (in older homes). Dangerous: the connection can overheat.
Wet spots on wire insulation. Water is actively in contact with electrical components. Call an electrician immediately.
Mold inside the box. Black or green spots. Moisture has been present for at least 2 to 3 weeks.
What to do:
If you find any of these signs, do not turn the power back on. Call an electrician and a plumber. The wall must be opened.
Step 7. What to do if you found signs. Action plan by hours.
Within the first 24 hours:
- Shut off water locally (under the sink, behind the toilet) or at the main valve.
- Call a professional with a moisture meter and thermal camera.
- If the wall feels wet to the touch, move furniture away, open windows, point a fan at the spot.
Within 48 hours:
- Open the wall at the wettest point. Typically a 20 by 20 inch square. Use a drywall knife or gypsum saw. Do not fear the hole. It will save the house.
- Assess the condition of the framing (wooden studs). If they are black, have fuzzy growth, or dent with a fingernail, they must be replaced.
- Soak up standing water with towels or a wet dry vacuum.
Within 3 to 5 days:
- Use a construction heater or heat gun (not above 120°F to avoid damaging wiring). Dry for 2 to 3 days.
- Treat all wooden surfaces with an antifungal containing chlorine or copper sulfate (1:10 ratio). This kills mold.
- Replace the cut out drywall with new material of the same type (gray for dry areas, green for wet areas). Apply joint compound, sand smooth.
Within 2 weeks:
- Fix the cause. Replace the leaking pipe, seal the window, repair the roof. Without this, everything will repeat in 2 to 3 months.
Step 8. How to prevent hidden leaks in walls. Long term prevention.
For coastal cities (Manhattan Beach, Hermosa Beach, Redondo Beach, El Segundo):
Ocean air has salt and 70 to 90% humidity. This accelerates pipe corrosion and weakens window seals. Check walls around windows twice a year.
Inspection schedule:
Once a month. Look behind washing machines and dishwashers, under kitchen sinks.
After every heavy rain. Inspect walls below windows and in corners.
Twice a year. Use a moisture meter on all walls, especially in bathrooms and kitchens.
Humidity control inside the home:
Buy a hygrometer (costs 10 to 20 dollars). Normal range is 40 to 55%. Above 60% risk of condensation inside walls.
Use a dehumidifier (from 200 dollars). In Manhattan Beach, you need it from November through March.
Do not dry laundry indoors without an exhaust fan.
Materials that help:
When renovating, use moisture resistant drywall (green) in all rooms, even bedrooms.
Add antifungal additive to paint (for example, sodium borate).
Leave a ventilation gap of 3/8 to 5/8 inch between drywall and exterior walls.
If you live in Culver City, Manhattan Beach, Hermosa Beach, Redondo Beach, Marina del Rey, Playa Vista, Playa del Rey, or El Segundo and suspect a hidden leak inside a wall, do not guess. Call professionals with thermal cameras and moisture meters. In Los Angeles, companies like Ursa Pro offer these services. They will find the swamp where you only see a white wall. They will tell you open here, dry like this, replace that. Before the drywall turns to crumb and the outlets start sparking.

Оставить комментарий